
How to Install WordPress Website from C-panel in Bluehost
How to Install WordPress Website from C-panel
Install a WordPress Website to gain access to a vast library of themes and plugins, enabling you to design a visually appealing and functional website. Whether you’re a blogger, an entrepreneur, or a small business owner, installing a WordPress website empowers you to showcase your brand, share your ideas, sell products or services, and engage with your audience effectively. With its flexibility, scalability, and extensive community support, WordPress is the go-to choice for anyone seeking to build a professional and dynamic online presence.
WordPress is a powerful and popular content management system (CMS) that allows you to easily create and manage websites. Whether you’re a seasoned developer or a beginner looking to launch your first website, installing WordPress is a crucial first step. In this tutorial, we’ll guide you through installing WordPress, providing you with a comprehensive step-by-step guide.
Things You Need to Install a WordPress Website
To install a WordPress website, there are two essential things you’ll need to have in place.
Web Hosting Account: You’ll need a web hosting account to store your website’s files and make them accessible online. Choose a reliable hosting provider that offers compatibility with WordPress and meets your website’s requirements. However, from your website hosting account, you will be able to access the user C-panel
Domain Name: A domain name is the web address that users will type in their browsers to access your website (e.g., www.yourdomain.com). Register a domain name that reflects your brand or website’s purpose. Some hosting providers offer a free domain name with their hosting plans.
A domain name can be purchased from web hosting companies such as Bluehost, Hostinger, or Namecheap. Moreover, this blog post will guide you on the following:
- How to Install WordPress on Bluehost
- How to Install WordPress on Hostinger
- How to Install WordPress on Namecheap
- How to Install WordPress on Truehost
- How to Install WordPress on HostGator
- How to Install WordPress from cPanel
- How to Install WordPress using Softaculous
- How to Install WordPress using QuickInstall
- How to Install WordPress using FTP
- How to Install WordPress on Your Computer
- Things to do After Installing WordPress
How to Install WordPress on Bluehost
Bluehost is recognized as one of the leading hosting providers globally, It stands out for its extensive experience with WordPress and its user-friendly approach to the installation process.
When you sign up with Bluehost, you can benefit from their seamless integration with WordPress. Bluehost automatically installs WordPress on your chosen domain name upon registration, saving you time and effort. However, Bluehost provides a convenient one-click installation feature even for WordPress website installation. Here’s a step-by-step guide on how to install WordPress on Bluehost:
Step 1: Sign up for a Bluehost account
Visit the Bluehost website (www.bluehost.com) and sign up for an account. Choose a hosting plan that suits your needs and complete the registration process. Bluehost offers various hosting options, including shared hosting, WordPress hosting, and more.

Step 2: Access the Bluehost cPanel:
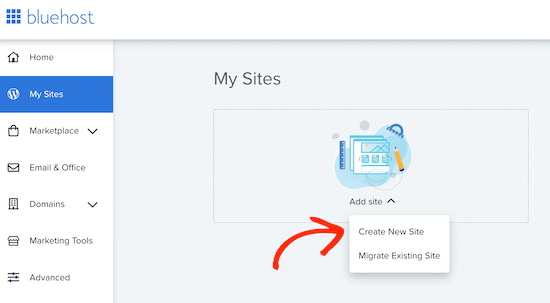
After signing up and logging into your Bluehost account, you’ll be taken to your account dashboard. In the Bluehost dashboard, locate the ‘My Sites‘ tab. This tab serves as your hub for managing and organizing your WordPress websites. Click on it to proceed. You’ll notice an ‘Add Site’ button within the’ My Sites’ section. Go ahead and click on it, and choose the “Create New” option to initiate the process of installing your new website to WordPress
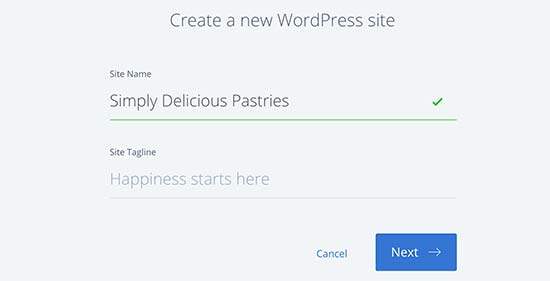
Step 3: Provide Site Title and tagline:
After choosing “Create New” Site from Bluehost Options, You will be asked to fill in the Name of your site as well as the tagline of your site. The tagline is a Bries description of what your site entitles, usually 20-30 words sentence with major Keywords.
Step 4: Start the WordPress Installation:
Proceed by clicking the ‘Next’ button to proceed further.
Bluehost will prompt you to choose a domain name and pathway for your website. If you have already acquired a domain name, you can simply choose it from the provided dropdown menu.
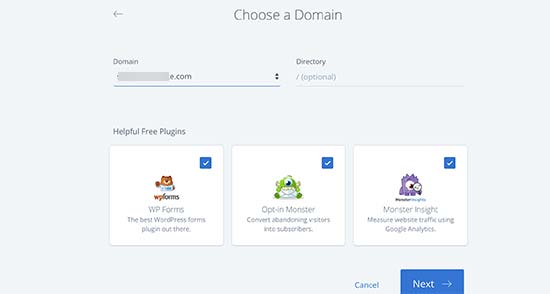
However, If you haven’t obtained a domain name yet, you can buy one by accessing the “Domains” page within your Bluehost dashboard.
When selecting a domain name, you can leave the directory path field empty and let Bluehost automatically assign one for you. During the installation process, the installer will also present a selection of essential WordPress plugins that you might find useful.
To proceed, simply click on the “Next” button.
The installer will then proceed to configure your WordPress site, and this step may require a few moments to complete. Once finished, you’ll receive a success message containing pertinent details about your newly created WordPress website.
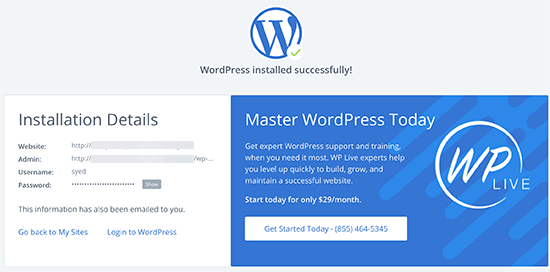
Bluehost will also deliver the login details to the email address you provided during the Account signup or installation process.
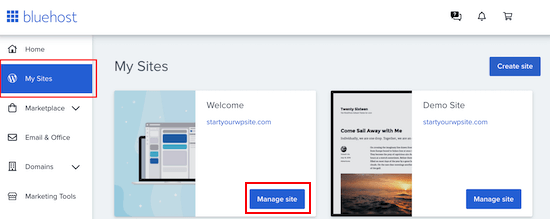
To access the administration area of your newly created website, navigate to the ‘My Sites‘ tab within the Bluehost dashboard. Locate your site domain or name and click on the ‘Manage site’ button.
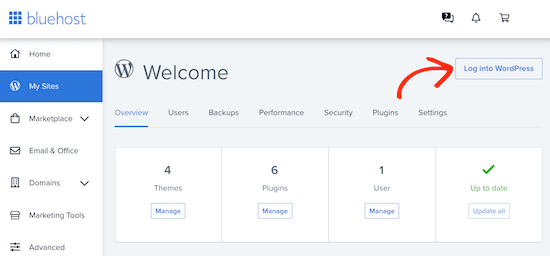
In the following step, locate the ‘Log into WordPress‘ button on the screen.
You will be directed to the administrative section of your website by clicking on it.


Leave a Reply